Antique Doll Dresses

Reproduction Clothes for Antique Dolls

  • Home
  • Shop
  • Learn
    • Sewing for Antique and Vintage Dolls
    • How to Sew Doll Dresses
    • Doll Repair, Restoration Seminars
    • How Measure Your Doll
    • Antique Doll Dress Styles
    • Hard Plastic Dolls from the 1950’s Clothes Information
    • Cissy Doll Dresses – What You Need To Know
    • Ideal Toni Doll Dresses Still in Demand
      • The Ideal Toni Doll: A Favorite Then and Now
      • Has your Ideal Toni Doll come undone?
    • Queen Anne Wooden Dolls
  • FAQs
  • Seminars
  • About Me
    • About Custom Doll Dresses

The Same Pattern

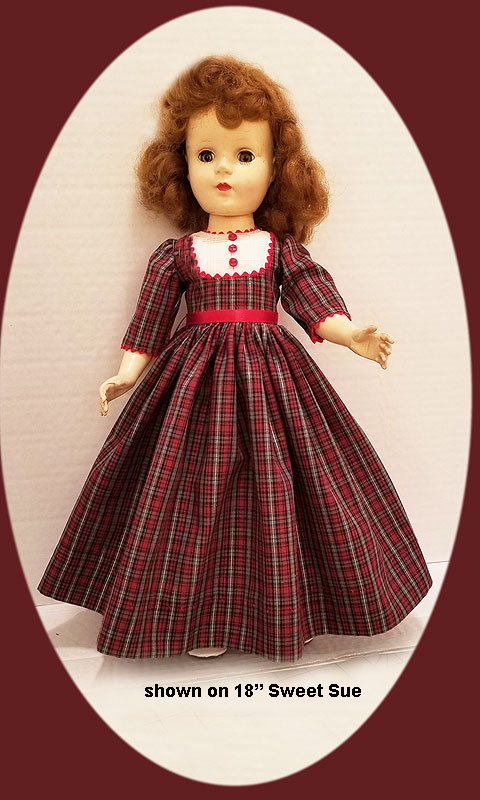
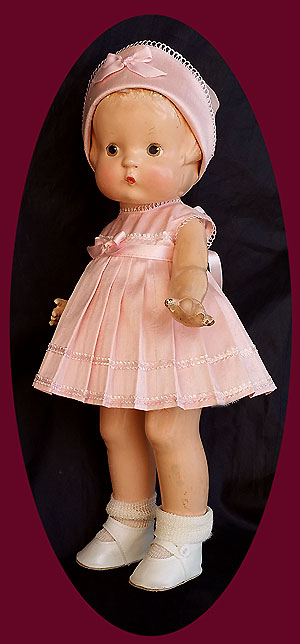
This dress is made from the same pattern as the one I just put on for sale a couple of weeks ago for Sweet Sue or Toni. The back and front are cut from the pattern, then I cut another front, and cut it down to show the fabric underneath, and finished the cut with rick rack, which I also used to finish the neck and sleeve. I lengthened the same sleeve by taking the sleeve pattern in the pattern and adding length to it. I made the bodice, then held the sleeve pattern up to see how much longer I would need to make it for a three quarter sleeve, then cut out a new sleeve pattern with the new length. It is put on exactly like the short sleeve. After I made the bodice, I put it on the doll and measured how long I had to cut the skirt. Because  a long skirt needs to have more width than a short skirt, I added 8 more inches to the width of the skirt as well as the length needed for each doll.  I  hope this will help you experiment with patterns!

Feel free to leave a question or comment below!

New Pattern for Toni and Sweet Sue–Dress, Slip, Panty

The new pattern is not quite done, but is getting close– I hope to have it ready to go to press by the end of next week, and ready for sale the following week.

Patterns take a long time to do when you take the time to do detailed instructions.Since the new pattern will be a basic dress, slip and panty,  I want the instructions to be detailed enough for it to be easy for even beginners, as well as simple enough so it will be easy to modify into a variety of styles. This post has a picture of the slips, the last one has a picture of the dress that will go on the pattern cover.

I am hoping everyone will like it. As soon as it is done I will make some more dresses from it showing a variation in the sleeve and/or trim.

I will post as soon at it is read to go and is on the site for sale. Hope you are all having a lovely fall!

Feel free to leave comments below!


Important Machine for Beautiful Doll Dresses

I hope you are not bored with the machines I describe. Without the serger with the tiny rolled hem, I would simply have to spend so much more time finishing dresses and underwear that I would have to add to the price.

I have my sergers set on the rolled hem and leave them there– for doll dresses, I never need them for anything else. I do have two of them — one has white thread always, the other I change threads on occasionally when doing dark colored clothing that the white doesn’t work well on. If I am not putting on matching thread, this serger always has off-white.

I bought the Janome serger only for the rolled hem—and it was the easiest to thread and use of all I tried, plus– the price as you can see is very reasonable. Before you buy any serger, I highly recommend  you first go to s sewing machine store that offers many brands, and try several hands on. Take with a  couple of pieces of light weight cotton to try it on. I specifically recommend this one. Read the reviews as well before you decide.

I am adding this serger as a suggestion today because I will soon be putting some things on the blog that have instructions to do some finishing with the tiny rolled hem on the serger, and want you to know what I am talking about when I mention it. The picture with this text shows the tinish on a small doll teddy. This is for a 9″ doll, and any other kind of finish would be difficult and probably bulky ( like adding lace or just a folded hem.) I know this for a fact because for more than 50 years I was left with no choice but to do it the hard way! If you will click on the picture to enlarge it you can see the neat little finish.

I also use this same serger with the rolled hem stitch to finish inside seams on the dresses.

A friend who makes reproduction dolls ( and therefore reproduction clothes) said of this finish, “but that is not authentic ( meaning it was not the way an original would have been done) so how can it be heirloom?” Here is your answer: heirloom sewing is NOT the same things as exact reproductions of antique items. Heirloom doll clothes are clothes that are expertly sewn and finished beautifully. As a matter of factual interest— much of the  underwear on antique dolls was NOT beautifully finished, in fact it was often left with unfinished raw edges. Would you really want to buy– or sell for that matter– garments cut out and left with raw edges?  What if you told your customers, “but this is AUTHENTIC, exactly like the factory ones were!  Do you think they would then want the underwear ( or even dress) with unfinished raw edges?  What we strive for here are dresses that look like the pictures of beautiful dolls new in the box— not dresses that replicate the unfinished underwear or  visible sewn hem.

I am happy to answer any questions you may have. You will NOT receive emails, all comments or questions will be answered right her on the blog.


How I Made This Patsy Dress

I made this Patsy dress   using my basic Patsy pattern that is for sale here. The pattern is also pictured here.

To make the silk dress from the pattern, here are the simple changes I made:

I left off the sleeve and finished the armholes with  the same tiny trim I used on the neck instead.

I added some of the tiny looped trim across the bodice.

Instead of gathering the skirt, I added tiny trim to it, then  pleated it, and I added a silk ribbon sash at the waist, with an accent bow on the center front waist. 

To change the look of the hat, I only altered the brim by making it less full, and adding the trim to the band and the bow.

Here is another view of the silk dress. Most patterns are easy to alter the look of with simple changes! I try to make mine basic so this is easily done.

Leave questions or comments below. You will NOT be spammed or get a bunch of emails!

How I Made this Antique Style Dress from a Basic Pattern

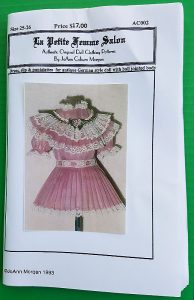
This dress was made using one of my basic patterns offered for sale here on my website. (The pattern does not include instructions on making the hat, or on making the gathered lace referenced in this article, but it does include the pattern pieces for the slip and drawers – antique style panties along with all of the complete dress pattern pieces).

To go from the dress pictured on the pattern to the pink silk dress shown here, first I added length to the skirt pattern so I could give it a 2 inch hem it instead of adding lace.

I narrowed the sleeves so they were more tailored instead of full. I tailored the bodice and added strips of lace-trimmed fabric from the shoulders to where the bodice meets the skirt.

Final touches included adding Venice lace to the top part of the skirt and to the bottom edge of the sleeves, and creating  a rosette at the neck and a double self-fabric bow at the waist.

Leave questions or comments below. You will NOT be spammed or get a bunch of emails!

In loving memory: JoAnn Morgan

Gone but not forgotten

We have disabled the shopping feature of this site until I can get Mom’s book “Through the Eyes of Gretchen” Published.

I am sorry for any inconvenience.

Harmony (daughter and webmaster)

Blog Menu

  • How to Sew Doll Dresses
  • Tools of the Trade
  • Seminars
  • Recommended Resources
  • Make this Doll Dress
  • Fabrics, Trims & Embellishments

You Can Repair and Restore Dolls As A Career!

[gallery link="file" columns="2" ids="21,23,20,22"]

Doll Repair & Restoration Seminars

Now offering  more than one kind of seminar - Call Rubie at 1-214-403-7077 to decide which seminar is best for your goals. Full seminar, antique dolls to modern, including china and bisque dolls, includes cloth, papier Mache, and other … Get Details!

Doll Repair & Restoration Seminars

Doll Repair and Restoration Seminars — not a hobby, a lifetime career!

Now offering  more than one kind of seminar - Call Rubie at 1-214-403-7077 to decide which seminar is best for your goals. Full seminar, antique dolls to modern, including china and bisque dolls, includes cloth, papier Mache, and other

Get The Details

Doll Repair – Stringing

Merry Christmas

About the Lace I Am Putting On….

Because of illness, I am liquidating  a 70 year accumulation of fabrics, trims and goodies in my sewing room. I am unable to sell by the yard as there is simply too much of it!  So all items will be … [Read More...]

Queen Anne Dolls

Since I am not actually in the doll business but am offering these for sale,  I feel I need to share the whole story with my customers. Many years ago I bought a collection of old dolls, and in the collection was a carved wooden Queen Anne doll from … More...

Frequently Asked Questions

Joann…I feel stupid but I can not tell the grain on material… You said it really matters that it is cut right.. If you get a chance explain to me how to tell.. I appreciate your time.. Looking forward to trying the patterns you just sent me but afraid

Hi Mary, sorry it is confusing for you.  Here is a picture of a bolt of fabric telling how to tell … [Read More...]

I have an antique doll by Lena Schwartz. How do I sell it?

I am sorry, I have been out of the doll business for almost 20 years and all the dealers I knew have … [Read More...]

What Makes a Doll Antique or Vintage

Before eBay set their own ideas for what is antique or vintage, a doll to be considered vintage had … [Read More...]

More Posts from this Category

Privacy Notice · Terms of Use · Contact Us · Copyright © 2025 · Base Website · Custom Web Design by Coburn Enterprises · Log in